Saturday, July 31, 2010

Kiss Cookies

When I made Peanut Butter Kiss Cookies for friends, I made a special batch of cookies for Son #2 because he's allergic to peanuts. I don't like to make foods he can't eat, but if I do, I always make a special allergy-free batch for him. He LOVES when I make special treats for him. :)

These cookies were soft, buttery and melt-in-your-mouth delicious! These cookies were so large we ended up with 8 cookies. I measured out one tablespoon of dough per cookie when I made the Peanut Butter Kiss Cookies and those were the perfect size. I'll do that with this batch next time...

These were tasty but the chocolate to cookie ratio was off.
Note: Use less dough and make bite-sized cookies.

Kiss Cookies

Yield: 8 large cookies, ~3" diameter (I recommend smaller cookies, ~1" diam.)

Ingredients:
  • 1/3 c powdered sugar
  • 1 stick butter
  • 2 tsp vanilla
  • 1 c flour
  • 1/4 tsp salt
  • Hershey Kisses, unwrapped
Directions:
  1. Preheat oven to 350F. Line baking sheet with parchment paper or silpat.
  2. In stand mixer bowl, combine powdered sugar and butter until thoroughly combined.
  3. Add vanilla and mix well.
  4. Gradually add flour and salt and mix until dough forms.
  5. I originally used a Pampered Chef medium scoop to measure out the dough which I turned out to be too much dough. I recommend using a tablespoon to measure out cookie dough balls: one leveled tbs per cookie, roll into ball and place on lined baking sheet 1-2 inches apart.
  6. Bake 13-15 mins or until lightly browned. Do NOT over-bake!
  7. Remove from oven and gently press unwrapped Hershey Kiss in center of each cookie.
  8. Return to oven and bake another 2-3 mins or till cookies are golden.
  9. Cool 5 mins on baking sheets then transfer to wire rack to cool completely. ENJOY!

Source: Adapted from Food Allergy Mama

Friday, July 30, 2010

Peanut Butter Kiss Cookies

Although Son #2 has peanut allergies, I do have peanut butter in the house. My six year old can tolerate peanut products around him but he definitely cannot eat peanuts or nuts of any kind. Every time I open the peanut butter jar, I'm extremely careful to keep it contained and I wash everything immediately. If peanut products were life-threatening to my son, I most definitely would not have it in my house. 

Our friends were camping at Doheny State Beach so I baked them Peanut Butter Kiss Cookies. I wanted to use up the remaining peanut butter in the large, Costco-sized container and I had the perfect amount for these little cookies.

Stay tuned for an egg-free and peanut-free version of these cookies. That post is next! :)

Peanut Butter + Chocolate = Bliss

Peanut Butter Kiss Cookies...
AKA Peanut Butter Blossoms

Yield: ~ 3 dozen cookies

Ingredients:
  • 1 1/2 c flour
  • 1 tsp baking powder
  • 1/4 tsp salt
  • 1/2 c creamy peanut butter
  • 4 tbs butter, room temp
  • 1/2 c packed brown sugar
  • 2 eggs
  • 1 tsp vanilla
  • 1/4 c sugar, for rolling
  • 32-34 Hershey Kisses, unwrapped (I used regular and caramel kisses.)
Directions:
  1. Preheat oven to 350F. Line baking sheets with parchment paper or silpat.
  2. Combine flour, baking powder and salt. Mix well and set aside.
  3. In low bowl, add 1/4 c sugar for rolling and set aside.
  4. In stand mixer bowl, add peanut butter and butter. Use paddle attachment and mix until smooth.
  5. Add brown sugar, eggs and vanilla and mix well.
  6. Reduce speed to low and gradually add flour mixture. Continue mixing until dough forms.
  7. Use a tablespoon to measure out cookie dough balls: one leveled tbs per cookie, roll into ball, roll each ball in sugar and place on lined baking sheet 2 inches apart.
  8. Bake 8-9 mins. Cookies are lightly browned and slightly puffed up. Do NOT over-bake!
  9. Remove from oven and gently press unwrapped Hershey Kiss in center of each cookie.
  10. Return to oven and bake another 2-3 mins or till cookies are golden.
  11. Cool 5 mins on baking sheets then transfer to wire rack to cool completely. ENJOY!
Source: Adapted from Hershey's Kitchens

Wednesday, July 28, 2010

Hiyashi Chuka: Chilled Chinese Noodles

I've been following several foodie blogs since the beginning of the year and one that I enjoy a lot is La Fuji Mama because she prepares so many Japanese dishes. My boys would be so happy if I'd make more Japanese dishes so I joined Rachael's group, Washoku Warriors. She posts a challenge every month and members have all month to try the challenge. Unfortunately, I missed the last two challenges because I haven't been checking my google mail account. Now that that account is linked to my iPhone, I won't miss any more challenges. :)

I went ahead and tried the last challenge anyways, Challenge #11: Chilled Noodles, so I could finally try a recipe out of my new cookbook, Washoku: Recipes from the Japanese Home Kitchen by Elizabeth Andoh. I made a chilled Chinese noodle salad called Hiyashi Chuka. My Obaa-Chan (Grandma) made it on hot, humid days when I used to visit Japan and my Mom also made this on hot summer days as it's a refreshing, cold noodle dish. Good stuff!

This was the first time I made this dish for my fam and they LOVED it! As I took each bite, my fun-filled memories of summer vacations in Japan came flooding back. I enjoyed my lunch as I reminisced about Japan and will definitely make this again. I hope to make it on a super scorcher of a day as it seems to taste better when enjoyed on a hot day. :) It's been extremely overcast and cold here in San Clemente, so when the sun decides to pop out and starts to feel like summer, I'll surely make this again.

Delish!

Hiyashi Chuka: Chilled Chinese Noodles

For the recipe, check out page 178 in the cookbook, Washoku: Recipes from the Japanese Home Kitchen by Elizabeth Andoh.

This is super easy and fast to put together. Make the dressing a day in advance as it will taste better, boil noodles, add dressing over the noodles, prep toppings and place over the noodles. Easy! I marinated the cucumbers in a little dressing hoping Son #2 and Hubby would eat the cucumber. It worked!

Monday, July 26, 2010

Sloppy Joes with Cheese Sauce

This is the second time I made Sloppy Joes for the boys and they enjoyed every bite. This is a super easy meal to throw together. Ridiculously easy! I really should make it more often because quick and easy meals fit right in with our busy schedule. :) 

I used hot dog buns this time and it held the sloppy joe mixture in the bun perfectly. No mess this time around because the boys ate every morsel of the filling. I'm pretty sure Son #1 licked his plate clean!


I served this with a salad and strawberries.

Sloppy Joes with Cheese Sauce

Yield: 4-5 servings

Ingredients:
  • 2 tsp extra virgin olive oil
  • 1/2 onion, diced
  • 1 tbs garlic, minced (Use less if you don't like food too garlicky.)
  • 1 lb ground beef
  • 4 hot dog buns (or bread of choice)

sauce:
  • 1- 14.5 oz can tomato sauce
  • 1 tbs white wine vinegar
  • 1 tbs Worcestershire sauce
  • 1/2 tbs garlic, minced
  • 2 tsp brown sugar
  • salt and pepper to taste

Directions:
  1. In a bowl, mix sauce ingredients and set aside.
  2. Heat oil in large skillet over med-high heat. Cook onions, garlic and ground beef until cooked through.
  3. Add sauce mixture to skillet and stir well. Bring to boil then reduce heat to low and simmer for 45 mins or till sauce reduces to a thick consistency.
  4. While meat/sauce mixture is simmering, make cheese sauce. See recipe below...
  5. Scoop sloppy joe mixture onto bun, top with cheese sauce and serve with salad. ENJOY!

----

Cheesy and delicious. The leftover cheese was perfect for nachos!

Cheese Sauce

Ingredients:
  • 2 tbs butter
  • 1 c milk
  • 1 tbs flour
  • 2 oz cream cheese
  • 3 c shredded cheddar cheese

Directions:
  1. In sauce pan, melt butter over med heat till melted. Then whisk in flour and cook for 1-2 mins.
  2. Add milk and stir well.
  3. Add cream cheese and cheddar cheese and cook until melted about 3-5 mins.
  4. Keep warm over low heat until ready to eat.

Friday, July 23, 2010

Barbacoa Beef

I wanted an easy crockpot meal with a little spice. I found a recipe for barbacoa beef and I was sold. Crockpot meals are easy and delicious and a great way to make TONS of food when feeding a crowd.  When feeding my fam of four, I freeze half the meat so I have cooked, ready-to-eat beef for enchiladas. Having cooked meats in the freezer allows you to make a quick home-cooked meal when you need it. Just throw the frozen ziploc baggie of meat in your fridge overnight and let it thaw. Use it the next day for enchiladas, tacos, sandwiches, on salads, quesadillas or nachos. It's SOOO easy!

Mmmm......

Taco time!

Barbacoa Beef

Yield: 8-10 servings

Ingredients:
  • 1-2 tbs extra virgin olive oil
  • 3-4 lb boneless chuck roast
  • 2 tsp chili powder
  • 1 tsp cumin
  • 1 tsp paprika
  • 2 c beef stock
  • 4 tbs tomato paste
  • 1-2 chipotle peppers in adobo sauce, minced
  • 2 sweet onions, one cut into eighths and the other diced
  • 2 tbs garlic, minced
Directions:
  1. Cut one onion into eighths and place in bottom of crockpot. Reserve diced onion for top of beef.
  2. Heat olive oil in large skillet over med-high heat. 
  3. Combine spices in bowl.
  4. Cover beef completely with spice rub. 
  5. When oil is hot, place beef in skillet and sear each side. DO NOT move the meat while it cookes 2-3 mins per side.
  6. Remove beef from skillet and place over onions in crockpot.
  7. In same skillet, over med-high heat, add beef stock and scrape up any browned bits. 
  8. Add tomato paste and minced chipotle and whisk into sauce. Bring sauce to boil, reduce heat and simmer till sauce has reduced and thickened slightly.
  9. Add diced onion and garlic on top of seared beef in crockpot. Pour sauce over onions, garlic and beef.
  10. Cover and cook on low for 6-8 hrs or high for 3-4 hrs.
  11. Remove beef from crockpot and shred with two forks. Use slotted spoon to remove onions. Add to shredded beef and mix well. Add some of the sauce if beef is dry.
  12. Make beef tacos. Top with salsa, tomatoes, onions, cilantro, cheese or hot sauce. ENJOY!

Wednesday, July 21, 2010

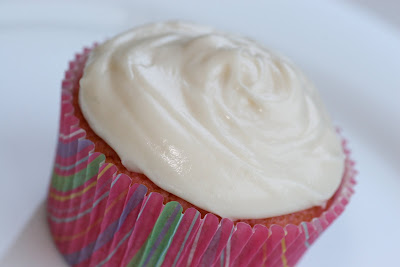
Strawberry Cupcakes with Cream Cheese Frosting

When I came home with several boxes of store-bought cake mixes, Hubby raised an eyebrow and asked why I bought so many boxes. I explained they were my emergency mixes and he gave me a very funny look and asked how cake mix is considered "emergency food." I obviously didn't mean a real emergency, but an emergency in the sense that when pressed for time, I can whip up a quick dessert. Everyone should have an emergency box of cake mix in their cupboard!  ;)

We enjoyed an impromptu barbecue at my parents' house in honor of my sister's birthday. I had just enough time to throw these cupcakes together. Good stuff!  

YUM!

Happy Birthday, E!

Strawberry Cupcakes


Yield: 24 cupcakes

Ingredients:

  • Strawberry cake mix
  • 7-Up, 12 oz
Directions:
  • Preheat oven to 350F and line muffin pan.
  • Place cake mix in stand mixer bowl. Mix on low.
  • Slowly add 7-Up, increase mixer speed and mix completely.
  • Using a Pampered Chef medium scoop, add a scoopful of batter in muffin liner.
  • Bake on middle rack for 20-25 mins or until toothpick inserted in center comes out clean.
  • Cool in muffin pan for 5 mins and then transfer cupcakes to wire rack. Cool completely before frosting. ENJOY!
Cream Cheese Frosting

Yield: frosts 18-24 cupcakes

Ingredients:
  • 6 oz cream cheese, softened
  • 1/2 stick butter, softened
  • 1 tsp vanilla extract
  • 1 1/2 c powdered sugar
Directions:
  1. Add first three ingredients in med-large bowl and mix on medium speed with electric mixer until light and fluffy.
  2. Add powdered sugar and mix until desired frosting consistency is reached. Be sure cupcakes are fully cooled before frosting. ENJOY!!!

Monday, July 19, 2010

Blueberry Banana Bread


My boys love banana bread. They love when I put chocolate chips in it but I wanted to make a healthier version and threw in some fresh blueberries instead. It was a great combination and turned out really good! Delicious!

Bursting with blueberries.

Banana bread smells sooooo good!

Blueberry banana goodness.

Blueberry Banana Bread

Ingredients:
  • 1/2 c sugar 
  • 1/2 stick butter
  • 3-4 bananas, mashed
  • 2 c flour
  • 1 tsp baking soda
  • 1 tsp salt
  • 1 1/2 c blueberries, frozen or fresh
  • 1/2 c chopped nuts (optional)- I avoid due to son's treenut allergies)
Directions:
  1. Pre-heat oven to 350F.
  2. Mix together sugar, butter and bananas. 
  3. In separate bowl, mix flour, baking soda and salt. Then add to banana mixture.  
  4. Add blueberries and mix gently. 
  5. Bake at 350F for ~1 hr. Test for doneness with toothpick.
  6. Cool completely before cutting and serving. ENJOY!

Wednesday, July 14, 2010

Buffalo Chicken Dip with Celery "Fans"

This is a delicious appetizer! The flavor of hot wings minus the mess yet cream cheesey so it's not too spicy. It's a great way to get friends and fam to eat their celery, too. :) For those who don't care for celery, serve with bread, crackers or tortilla chips. This was really good hot out of the oven but just as tasty when served cold on day 2. It was the perfect spread for sandwiches, too.

Yum.

Buffalo Chicken Dip with Celery

Yield: 3 cups

Ingredients:
  • 2 c cooked chicken, shredded and chopped
  • 3/4 c Buffalo wing sauce
  • 6-8 oz Neufchatel cheese, softened
  • 1 c Ranch dressing (I used fat-free sour cream)
  • 1/2 c shredded mozzarella cheese (I omitted)
Directions:
  1. Preheat oven to 350F.
  2. In stand mixer bowl, combine all ingredients and mix well.
  3. Transfer mixture to 8x8 baking dish.
  4. Bake for 30 mins or till heated through.
  5. Serve with celery, sliced bread, tortilla chips, crackers, etc..
~~~~~~~~~~~~~~~~~~~~~~~~~~~~~~~

To avoid double dippers from contaminating your dip, cut the celery into smaller 1-2" pieces and slice the ends into 3-4 skinnier stalks. Be sure not to cut all the way if you want the "fans." This way, you get more dip on your celery so there's no need to double dip!


Celery "Fans"

Ingredients:
  • celery
  • bowl of ice water
Directions:
  1. Set aside bowl of ice water.
  2. Wash celery and cut into 1-2" pieces. 
  3. Cut ends of those pieces into 3-4 skinnier pieces.
  4.  Place prepared celery into water and allow ends to "curl."
  5. Drain and dry before serving.
Source: Adapted from Sauce and Sensibility

Monday, July 12, 2010

Cilantro Lime Rice

My boys L-O-V-E rice and this side was a hit for sure! Super simple and delicious indeed. Great side for any dish. So versatile...love it!

Good stuff!

Cilantro Lime Rice

Yield: 4-6 servings

Ingredients:
  • 1 c extra long grain rice (or Basmati)
  • 2 c water
  • 1/2 tsp salt
  • 1-2 limes, juiced
  • cilantro, handful (more or less to taste) washed and chopped
  • 2-3 tsp Canola oil
Directions:
  1. In small heavy pot, add rice, water, 1 tsp oil and salt. Boil on high till most water evaporates.
  2. When water covers top of rice, reduce heat to low and cover 12-15 mins.
  3. Turn off flame and keep covered add'l 5 mins.
  4. In med bowl, combine cilantro, lime juice, rice and 1-2 tsp oil. Toss until thoroughly combined. ENJOY!
Source: Adapted from Skinny Taste

Friday, July 2, 2010

Pork Pasta Salad

A great way to use up leftover meat is to put it in a salad. I whipped up a tasty pasta salad for my high school's third annual all-class alumni picnic. I watched everyone eat it up and comment on how tasty it was. :) Awesome! It's a light dish, easy to make and delicious, too.

Bow ties.
Pork Pasta Salad

Yield: 10-12 servings

Ingredients:
  • 16 oz Farfalle pasta (bow ties or pasta of choice)
  • 1/2 red onion, diced
  • red, orange and yellow pepper, seeded and diced
  • handful cilantro, washed, dried and chopped
  • 1 c shredded pork (or meat of choice)
  • 1/2 - 1 c salad dressing of choice (I used Bernstein's Light Cheese Fantastico)
Directions:
  1. Cook pasta according to directions. Drain, place ice in large bowl of water and add pasta to stop cooking process. When pasta has chilled, drain again and set aside.
  2. Add chopped veggies, cilantro and pork. Mix well.
  3. Add salad dressing last and mix well. Start with 1/2 c and add more as needed. If too dry, add another 1/4 c just before serving.
Related Posts with Thumbnails