Showing posts with label seafood. Show all posts

Wednesday, May 12, 2010

Blue Cheese Crab Cakes

I made crab cakes for the first time in December. They were delicious. Hubby and Son #1 REALLY enjoyed them! Son #2 has shellfish allergies so he ate chicken tenders instead. I always make food that we can all enjoy as a fam as I don't like to exclude my son, however, that night in Dec. I had an unusually strong craving for crab cakes. I went ahead and made them knowing Son would be perfectly happy with his serving of chicken. 

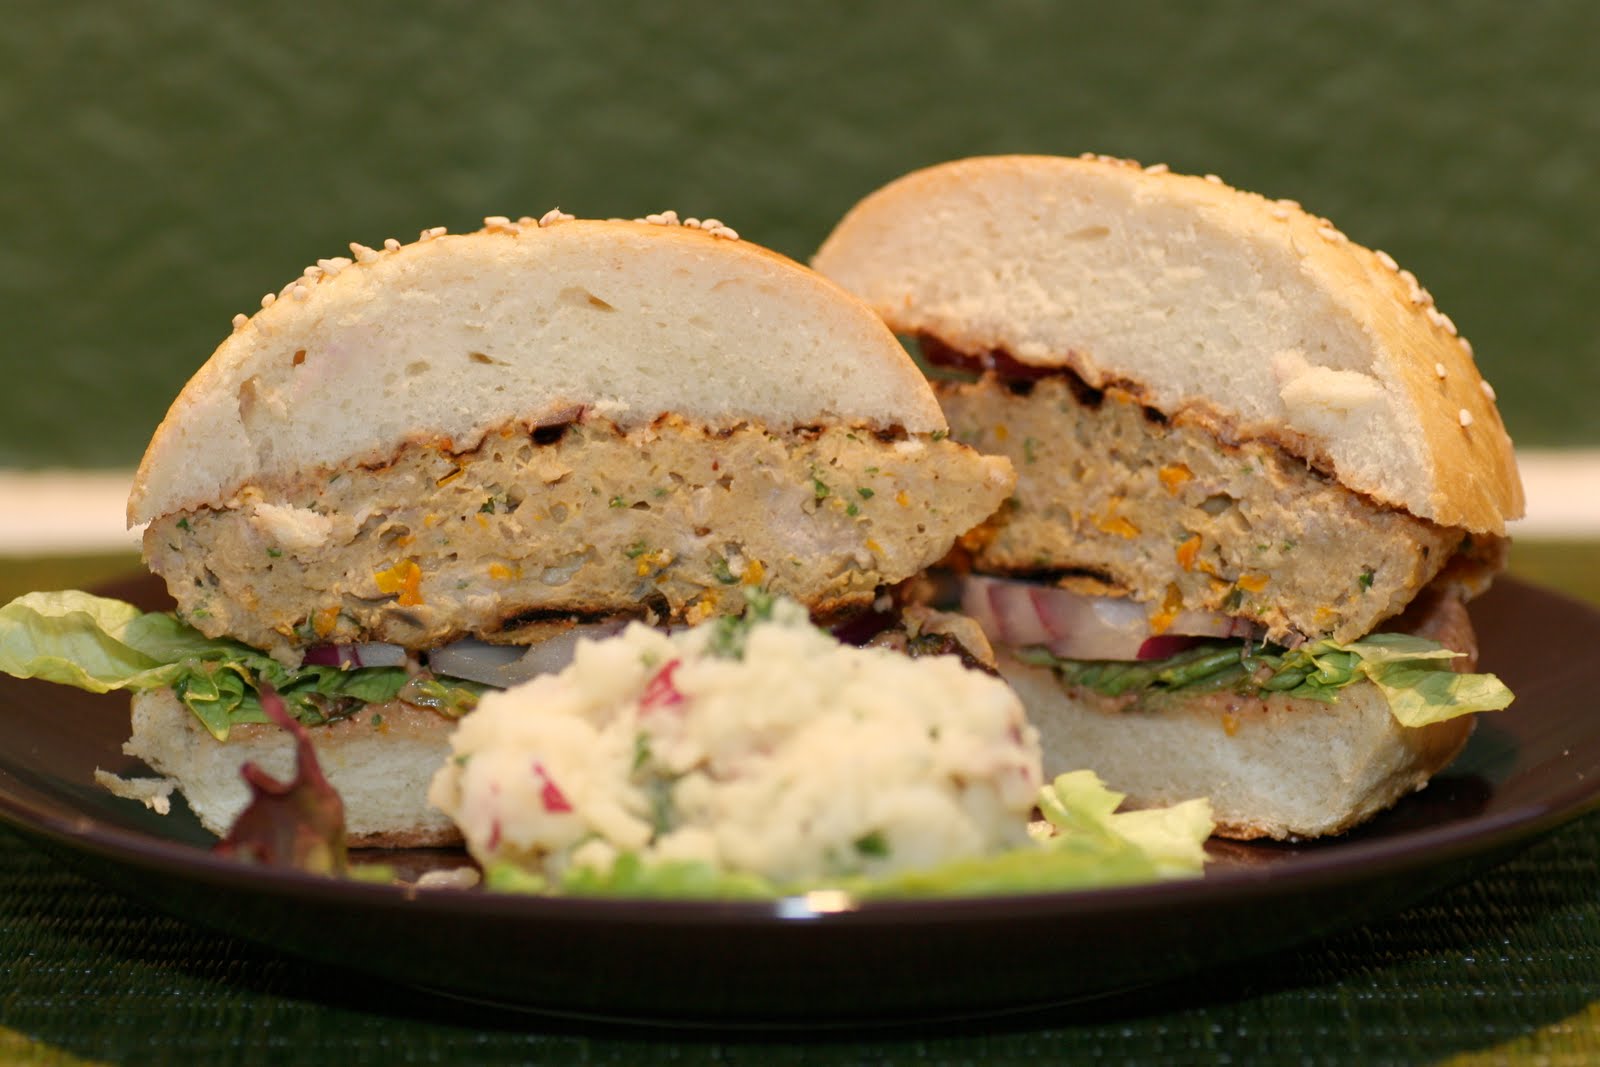
I needed a quick dinner I could whip together after the boys' Taekwondo class. I found a recipe for Blue Cheese Crab Cakes that sounded interesting and they turned out great. Hubby really likes blue cheese so I knew the recipe would go over well with him. Son #1 even ate 'em up. Like me, he's a foodie, too. ;) If you're not sure if you like blue cheese, make the crab cakes without the cheese. Blue cheese has a pungent smell and a sharp taste that takes getting used to so omit unless you know for sure that you and the blue cheese are friends. :)

DEEEEE-lish! 

Want a bite?

Blue Cheese Crab Cakes

Yield: 12- 3" crab cakes

Ingredients:
  • 16 oz lump crab meat
  • 4 oz crumbled blue cheese
  • 1/2 lemon, juice
  • 1 tsp Grey Poupon mustard
  • 1/2 tsp paprika
  • 1/4 tsp cayenne pepper
  • 1 tbs extra virgin olive oil
  • 1 egg
  • 1/2 c panko bread crumbs
veggie mix-in:
  • 1/4 c red onions, chopped
  • 1/4 c carrots, julienned
  • 1 tbs garlic, minced
  • Emeril's Essence (or garlic salt and pepper or seasonings of choice)

Directions:
  1. Preheat oven to 375F.
  2. In saute pan, spray with oil and heat over med-high heat. Saute veggie mix-ins for 4-5 mins. Set aside when done.
  3. In large mixing bowl, combine crab cakes ingredients and mix well. 
  4. Line baking sheet with parchment paper. Shape crab mixture into patties, 3" in diameter and 1" thick.
  5. Place crab cakes onto baking sheet about 1" apart.
  6. Bake 20-25 mins. Let sit 2-3 mins before serving.
Source: Adapted from Nooschi

~~~~~~~~~~~~~~~~~~~~~~~~~~~~~~~~~~~~

I still had organic avocados so I made an avocado dipping sauce. The sauce was similar to guacamole but a lighter version of it. I would've preferred a serrano chili in there to spice it up but I left it mild so Son #1 could eat it. I love all foods spicy so I just had to make a spicy sauce for myself. Glad I did because both sauces on the crab cakes made for a very nice flavor combination. YUMMMMM!

Yums.

Avocado Dipping Sauce

Ingredients:
  • 2-3 small avocados, pitted and peeled
  • 1-2 tbs mayonnaise
  • 1 lemon, juice
  • 1/4 tsp salt
Directions:
  1. Place avocados in food processor. Pulse till smooth.
  2. Add remaining ingredients and pulse some more. Sauce should be smooth. If it's too thick, add a little milk.
Spicy Chili Dipping Sauce

Ingredients:
  • 2 tbs sour cream
  • 2 tbs chili paste, Sambal Oelek (use less if you don't like it too spicy)
Directions:
  1. Mix sour cream and chili paste till thoroughly combined.

Tuesday, May 11, 2010

Avocado Cilantro Pasta

I had several ripe organic avocados that would've been perfect for guacamole but I wasn't in the mood for guac. Weird, because I love guac. Instead of making yummy guac, I poked around for a new avocado recipe and found one for dressing. A dressing for salad or used as a sauce for pasta. Versatile sauce. Good stuff.

The original recipe calls for white balsamic vinegar but I only have traditional balsamic vinegar so I used that instead. Unfortunately, it made my lovely, light green dressing turn dark and muddy looking. The dressing was also on the balsamic-y side but I didn't mind the strong taste. My kids eat everything but I guess vinegar's not their fave as they only ate a few bites of the pasta. :) For my second batch of dressing, I used 2 tbs white wine vinegar because my local store didn't have white balsamic vinegar. The dressing was still pretty vinegary. I'll have to try it with just one type of vinegar and see how it tastes. I served the dressing on Mother's Day and the fam liked it. I like honest feedback so they would've told me if it was horrible. I still want to work on the recipe and tweak the taste just a bit. If you have a suggestion, please send it my way. Thanks! :)

Dark but delicious.

Yummm.

Avocado Cilantro Pasta with Shrimp
Yield: 4-6 servings

Ingredients:
  • 1 lb angel hair pasta
  • 8-10 sundried tomatoes in oil, chopped
  • 1 lb shrimp (chicken, veggies or tofu would be great, too)
  • avocado cilantro sauce (see below)
  • cilantro, chopped 
Directions:
  1. Make avocado cilantro sauce (recipe below)
  2. Marinate shrimp about 30 mins in the sauce. Add enough sauce to coat the shrimp.
  3. Prepare pasta, drain, place back in pot and add sundried tomatoes. Keep covered till ready for shrimp.
  4. Heat large pan over med-high heat. Add shrimp and the sauce and cook approx. 3 mins stirring frequently. Be careful not to overcook the shrimp.
  5. Two ways to serve:  1.) Toss pasta in avocado sauce, place in serving bowl and top with shrimp before serving. 2.) Place pasta directly in serving bowl (no extra sauce), top with shrimp and serve. I preferred the plain pasta with the avocado cilantro shrimp. :) Garnish with chopped cilantro.
Avocado Cilantro 
Dressing/Sauce


Yield: 1 c

Ingredients:

dressing/sauce:
  • 3 small avocados
  • 1 c cilantro, chopped
  • 1 lemon, juice
  • 1 lime, juice
  • 1/4 c extra virgin olive oil
  • 3-4 garlic cloves, minced
  • 2 tbs red wine vinegar
  • I've tried 1/8 c balsamic vinegar as well as 2 tbs white wine vinegar.  

Directions:
  1. Scoop out flesh of avocados and place in food processor.
  2. Add remaining ingredients and process until smooth consistency is reached. 
  3. Do a taste test. Add more oil, juices or vinegar to taste and to thin out the dressing if needed.
  4. Keep in fridge. Enjoy as salad dressing, pasta sauce or marinade. 
Source: Adapted from Guilty Kitchen

Tuesday, April 20, 2010

Yellowtail "Burgers"

When Friend had website problems and Hubby helped him, he gave us TWO yellowtail fillets to thank Hubby for his 5+ hours that were spent recovering his site. We grilled the first fillet and that was tasty! I used my food processor for the second fillet and made "burgers" with it. I also made a spicy cocktail sauce spread and homemade buns, too. DELISH! Oh, yes, indeed it was! I'll most definitely make this again!

Raw yellowtail mixture. 
My boys asked if we could make handrolls with this.
Maybe next time...

I should've used more spray oil.

Love the grill marks! They look painted on. :)
DEEEEEELISH!

Grilled yellowtail "burgers" on a homemade bun.

Serve with potato salad, carrot sticks and a salad.
YUMS!

Yellowtail "Burgers"

Yield: 6 patties

Ingredients:
  • 1 yellowtail fillet
  • handful of parsley
  • 1 orange bell pepper, roasted
  • 1/4 c red onion, diced
  • 1/2 c panko bread crumbs
sauce:
  • 2 tbs sake (Japanese rice wine)
  • 2 tbs soy sauce 
  • 1 tbs Hoisin sauce
  • 1 tbs rice wine vinegar
  • 1/2 tbs sesame oil
  • 2 tsp garlic, minced
  • 2 tsp ginger, minced (use less or omit if you're not a ginger fan)
  • 1/2 tbs sugar
Directions:
  1. Make sauce and set aside.
  2. Cut fillet into smaller pieces and pulse in food processor till fish is a smooth consistency.
  3. If there's room in the food processor bowl, add parsley, bell pepper, red onions and pulse some more. Otherwise, remove half the fish to make room for veggies. Pulse till combined well.
  4. Put yellowtail mixture into med-large mixing bowl and add sauce. If making immediately, add the panko crumbs and mix thoroughly. I marinated the yellowtail/sauce mixture overnight and added the panko just before making the patties. 
  5. When panko is mixed in, make patties. I had enough yellowtail to make 6.
  6. Heat grill and cook patties on 3-4 mins per side till done. I cooked for about 12-15 mins total over med-low heat.
  7. Prepare buns with spicy cocktail sauce spread (recipe below), lettuce and red onions. Add yellowtail patties and be prepared for awesomeness. ENJOY!
~~~~~~~~~~~~~~~~~~

I wanted a spread for the buns and wanted to avoid mayonnaise. I had a little spicy cocktail sauce leftover so I used the sauce and a little sour cream to thicken it up. It was the perfect spread.

S P I C Y


Spicy Cocktail Sauce

Yield: 1/2 c (should be enough for 1 - 1 1/2 lbs of shrimp)

Ingredients:
  • 1/2 c ketchup
  • 1 tbs horseradish
  • 1/2 tsp chili powder
  • 1/2 tsp cayenne
  • 2-3 tbs Meyer lemon juice
  • 1 tsp Worcestershire Sauce
  • salt and pepper to taste
  • (sour cream if making a thick spread)
Directions:
  1. Mix ingredients in med bowl.
  2. This is spicy cocktail sauce. If it's too spicy for you, add more ketchup to mellow it out.
  3. If making a spread for fish, sandwich or burger, mix equal parts cocktail sauce and sour cream. It gives the spread a nice creamy texture without added fat from a mayonnaise-based sauce.

Monday, April 19, 2010

Yummy Yellowtail

A neighbor friend came over desperate for Hubby's help. Friend has a website, Cure Well Custom Bait Receivers, that went offline, and with an ad coming out the following week, he had to get it up and running again. He wasn't sure if Hubby would be able to help because he already spent four hours on the phone with tech support and got nowhere. Talk about frustration! Well, lucky for Friend because Hubby is a super smart software engineer and an excellent bug tracker. He looked at the code, checked here and there, fixed this and that, copied here to there and fully recovered the site. PHEW! It was a super obscure problem and took about five hours from start to finish. Good job, Hubby! Check out Friend's site...he makes a super cool product!

Friend fishes a lot and gave us TWO fresh yellowtail fillets as a thank you. I grilled one of the fillets for dinner. Yum yum!

Fresh fish...deeeee-lish!!!

Served with sauteed chard and potato salad.

Yummy Yellowtail

Yield: 4-5 servings

Ingredients:
  • 1 yellowtail fillet
  • 1/2 tbs sesame oil
  • 1/2 tbs Hoisin sauce
  • 1 tbs ginger, minced
  • 1 tbs garlic, minced
  • 1/4 c red onion, diced
  • salt and pepper to taste
  • lemon, optional
Directions:
  1. Cut a piece of foil big enough to wrap fish in. Wash and dry fish and place on foil.
  2. Drizzle sesame oil and Hoisin sauce over fish.
  3. Heat grill on low.
  4. Mix ginger, garlic, red onion, salt and pepper in a small bowl. Spread evenly over fish.
  5. Wrap fish and use a second piece of foil if needed.
  6. Grill over low heat for 15-18 mins. 
  7. Dish out, squeeze a little lemon juice on top, serve with rice, salad, veggies and ENJOY! 

Tuesday, March 23, 2010

Baked Salmon

I picked up a couple things for my Mom at Costco. Since she was at my house, she helped me with the kids while I put dinner together. That was nice. Real nice! She also made a Chinese-style salad dressing for me while I made the wine sauce. The boys love that sweet dressing and will eat up all their salad and veggies with that dressing on it. 

The kids were hoping the salmon I bought was going to be served as salmon sushi. They love making their own little handrolls but that's something we do at my Mom's house. I baked the salmon with slices of lemon and served it with wine sauce. The best part about making wine sauce is enjoying a glass while I make it. :)

Baked salmon with lemon slices. Yum yum.

Serve with blanched spinach and a salad. DELISH!

Baked Salmon with Wine Sauce

Yield: 4-5 servings

Ingredients:
  • salmon fillet (I used one from Costco)
  • salt and pepper to taste
  • 1 lemon, sliced
  • dill weed
sauce:
  • 1 tbs butter
  • 2 tbs garlic, minced
  • 1/3 c white wine (I used Sauvignon Blanc)
Directions:
  1. Preheat oven to 450F.
  2. Line a baking sheet with edges with aluminum foil. Spray with oil.
  3. Place salmon on prepared sheet and sprinkle with salt and pepper. Top with lemon slices.
  4. Bake for 15-20 mins. Then, I set oven to broil and broiled for about 5 mins to brown the top.
  5. While salmon is baking, prepare sauce. Melt butter over med-low heat, add garlic and cook for 2-3 mins. Add wine and cook for 6-8 mins or until sauce is reduced by half. 
  6. Place salmon on plate and pour wine sauce over top. Sprinkle with dill weed and eat immediately. ENJOY!
Source: Adapted from Life's Ambrosia

Thursday, March 18, 2010

Baked Halibut

Wow! This halibut is really good. Tasty stuff for sure and the fam LOVED this. My boys really enjoy eating all the great food I've been cooking up for them. Son #1 LOVES to eat and doesn't know when to stop sometimes. I know he's growing and needs to refuel, but there are times when he eats so much that he'll end up with a stomach ache. I'm cooking in smaller portions and putting away the extras if I'm making a double batch of something. That way, we stick to "normal-sized" portions.

The sauce was delicious.

A perfect portion served with a warm beet salad.

Baked Halibut with Garlicky Sour Cream Sauce

Yield: 4-5 servings

Ingredients:
  • halibut fillet (mine was just under 1 lb)
  • salt and pepper to taste
sauce:
  • 3 tbs nonfat sour cream
  • 2 tbs garlic, minced
  • 1/4 tsp dill weed
  • 2 tbs parmesan cheese
  • 4 green onions, chopped (reserve a little for garnish)
Directions:
  1. Blot halibut dry with paper towels. Place in baking dish (my fillet fit in an 8x8" dish) and let halibut come to room temp while you prep sauce. Preheat oven to 375F.
  2. In small bowl, stir together sauce ingredients. Spread evenly over top of fish.
  3. Bake 20-30 mins until internal temp reaches 145F or until fish feels firm. Mine took 25 mins to cook through. Dish out fillet, sprinkle with remaining chopped green onions and serve immediately. ENJOY!
Source: Adapted from Kalyn's Kitchen
Related Posts with Thumbnails