Sunday, February 28, 2010

Carne Asada Enchiladas

As I was grilling carne asada, I realized I didn't want to eat meat for dinner. Even with all the Mexican fixings that I provide, I just wasn't feeling it. Weird. Since I wasn't in the mood for beef on its own, I made carne asada enchiladas instead. You might think it's a "waste" to use carne asada for enchiladas but it was delicious! I believe great food should have great ingredients so I thought it was fantastic! The carne asada filling made for a "gourmet" enchilada. We enjoyed it!

For the red sauce, I tried a recipe that Gina's WW Recipes posted the other day. I was drawn to it because the sauce called for chipotles in adobo sauce. I LOVE the smokey flavor and the heat from chipotles in adobo! Ok, ok, I'll also admit that I was excited to try a version of red sauce using canned tomato sauce. :) Last month, I made red chile enchilada sauce using fresh tomatoes but it was a lot of work for a sauce that was only "good." Gina's sauce is easy to make and tastes fantastic. I'll definitely make it again!

Carne Asada- Flap meat (I usually use flank or skirt steak) with a cinnamon chipotle rub, minced garlic, cilantro and juice from 3 limes. 

Sliced thin and at an angle. Cut against the grain.
For enchiladas, I cut the slices into bite-sized pieces.

The perfect amount of "spicy."

You've gotta try this!

Carne Asada Enchiladas

Yield: 3 servings, 2 enchiladas per person

Ingredients:
  • 6 tortillas (fajita size)
  • cheese (cheddar or Mexican mix)- I used 6 slices...I think I use less cheese by using slices vs shredded. 
  • cooking spray
sauce:
  • 1 tbs garlic, minced
  • 1 chipotle chile in adobo sauce, minced (use 2 for more heat)
  • 1- 15.5 oz can tomato sauce
  • ~12 oz chicken stock (I used tomato sauce can and filled it 3/4 full)
  • 1/2 tsp cumin
  • 1/2 tsp chipotle chili powder (I omitted)
  • salt and pepper to taste
filling:
  • 1-2 c carne asada, cut into bite-sized pieces
  • 1- 15.5 oz can hominy (or veggie of choice)
  • 1/4 c red sauce from above to "wet" the ingredients
Directions:
  1. Spray med. saucepan with oil and saute garlic. Add sauce ingredients and bring to a boil. reduce heat to low and simmer for 30 mins.
  2. Preheat oven to 350F.
  3. In med. bowl, add filling ingredients and mix well. Spray 8x8" baking dish with oil. Coat bottom of dish with a little red sauce, too.
  4. Put 1/3 c beef mixture into tortilla and roll it. Place in baking dish, seam-side down. Roll remaining tortillas and place in baking dish.
  5. Top with red sauce to cover enchiladas and bake uncovered on middle rack for 20 mins (I froze my leftover sauce).
  6. Turn off oven, remove dish, top with cheese and place back in warm oven for 5-7 mins to melt cheese.
Notes: Top with guacamole, sour cream, smokey chipotle salsa, black bean/corn dip or hot sauce. ENJOY!!!

Souce: Adapted from Gina's WW Recipes

Saturday, February 27, 2010

Black Bean/Corn Dip

A fabulous recipe I got from Kat about five years ago was for her black bean and corn dip. She brought it over when I had a get-together and I thought it was amazing. I couldn't stop eating her dip. It's really good stuff...like way good! I found myself going back to it throughout the evening, and with each fully loaded chip, I kept telling myself, "This is my last chip. For reals." Shoot, I probably ate half the dip that night. That's how addicted I was to her dip! Since then, I've made it for potluck parties, my own parties and as a side to go with my Mexican meals if I don't make salsa. I get compliments on it every time. Thanks, Kat, for hooking me up with such a delicious dip!

Light and refreshing.

I portion it out so I don't overdo it. :)

MMMMMM....

To refrain from eating a whole bag of chips with this dip, I eat it on my salads.
Carne Asada Salad...YUM YUM!!!

Black Bean/Corn Dip

Yield: 8-10 servings*

Ingredients:
  • 1- 15 oz can corn, drained
  • 1- 15 oz can black beans, drained and rinsed
  • 2-3 vine-ripened tomatoes, seeded and diced (I used grape tomatoes for this batch)
  • 3-4 jalapeƱos, seeded and minced
  • 1/2 small red onion, minced
  • 4-6 cloves garlic, minced
  • cilantro, minced (I used half bunch)
  • 4 limes, juiced (I LOVE my Pampered Chef Citrus Press!)
  • 1 tsp sea salt
  • 1/2 tbs Emeril's Essence ** 
  • 1-2 avocados, pitted and chopped (add just before serving)
Directions:
  1. In a large bowl, mix together ingredients except avocados.
  2. Refrigerate for 2+ hrs so flavors can mingle.
  3. Add chopped avocados prior to serving and fold into dip gently.
  4. ENJOY!!!
Notes: 

*If you're "dipped" out, use the leftovers in soups, quesadillas or enchiladas.

**This was the first time I made the dip with Emeril's Essence. I usually use garlic salt, garlic powder, sea salt, pepper, onion powder and cayenne pepper. Since those ingredients (plus some) are already in the "Essence," I decided to give it a try. It was great!

Source: Adapted from Kat, my chef friend. She finally started a blog...YAY!
~~~~~~~~~~~~~~~~~~~~~~~~

With or without the crumbled chips, this is a delicious salad.


I love this dip so much that I could probably eat the whole bowl by myself with a big bag of chips. Not good for my waistline so I've been eating the dip as a salad topper instead. That's a much healthier choice and I don't feel guilty when I pile on the dip. :) I use it as my "dressing" and it's yummilicious! I add chicken or beef and sometimes crumble some chips on top to make a "taco salad." It's filling, healthy and delicious.


Salad with Black Bean/Corn Dip 

Ingredients:
  • lettuce, washed and chopped (any green leafy type would taste great)
  • 1-2 c chicken or beef, cooked and shredded 
  • 1 c orange bell pepper, chopped (additional veggies up to you)
  • black bean/corn dip- amount up to you but I add enough to cover top of salad
  • tortilla chips, crumbled and sprinkled on top
  • add avocado, pepitas, shredded cheese and/or dollop of sour cream, optional
  • Mexican Ranch Dressing, optional (I don't use it as the dip is enough "dressing" for me)
Directions:
  1. Place lettuce in bowl.
  2. Add chicken or beef.
  3. Throw in additional veggies if you'd like.
  4. Before adding to salad, give dip a good stir and scoop from bottom with LOTS of lime juice. Cover top of salad with dip.
  5. Add crumbled tortilla chips and additional toppings/dressing if you'd like.
  6. ENJOY!

Friday, February 26, 2010

Walter's White Bread

I made homemade sandwich bread in January and haven't bought a loaf of bread since. The boys LOVE homemade bread so I decided to poke around online to see if I could find another bread recipe. I recently found King Arthur Flour's (KAF) site. WOW! They post some wicked good recipes! I baked white bread and it turned out great. I'm quite impressed with how my loaf turned out. If you look at the pictures of my loaves from my honey wheat bread post, you can see that I'm finally making a smooth-top bread. I am learning! :)

This bread is called "Walter Sands' White Bread" and I wondered, "Who the heck is Walter?" He was the Owner and President of King Arthur Flour from '43-'68 and he created this bread recipe. KAF says it's "sandwich bread fit for the king" so I had to try it. Lemme tell ya...Walter made a terrific bread! 

Nice and smooth.
With a shimmery, buttery top, this is my best looking loaf to date. :)

Perfect slices.

Walter Sands' White Bread

Yield: 1 loaf

Ingredients:
  • 1 c + 2 tablespoons to 1 1/4 c lukewarm water (use the lesser amt in summer/humid climates and the greater amt in winter/drier climates)
  • 1 heaping tablespoon honey
  • 2 1/4 tsp instant yeast
  • 1 3/4 tsp salt
  • 2 tbs soft butter
  • 4 c flour
  • 1/2 c nonfat dry milk granules
Directions:
  1. Mix all ingredients in stand mixer bowl using flat paddle. Scrap sides as necessary. Then knead dough for 10 minutes using dough hook till a ball forms. In the same stand mixer bowl, lift out dough ball and lightly oil the bowl. Roll dough around in the oil then cover bowl with a damp towel. Allow dough to double in size for 60-90 mins in warm area free of drafts. Butter the loaf pan and set aside.
  2. Once dough has risen, roll dough into a thick, rectangular shape on a Roul'Pat. Roll dough into tight log the same length as the loaf pan you're using.
  3. Place rolled dough into loaf pan with seam-side down, cover again with damp towel and let it rise 1 - 1 1/2" over loaf pan, about 60 mins. During last 15 mins of rising, preheat oven to 350F.
  4. When dough is ready, bake for about 20 minutes. If it's too brown on top after 20 mins, place foil over bread and bake for another 10 mins, for a total of 30 mins. The temperature of the bread should read between 195 - 200F.
  5. Turn loaf onto wire rack immediately. Spread butter over top of bread using the stick of butter. Much easier than using a pat of butter that would slip off and make a mess. :) 
  6. Allow bread to cool completely before slicing. ENJOY!

Thursday, February 25, 2010

Chicken Marsala

There's something wonderfully delicious about chicken, garlic, marsala and mushrooms. YUM! The first time I made chicken marsala was in Dec. and we all thought it was fabulous. It was a quick dish to put together yet it tasted like I spent countless hours in the kitchen. :) The fam was quite impressed with the incredible flavors of the chicken and the sauce. SUCCESS!

I used white mushrooms the first time but I wish I would've made more sauce...it was SO good!

For mock marsala, I baked a whole chicken and used baby bella mushrooms for the sauce.
BOTH meals were great!

Because I had a whole chicken that had to get baked, I took a major shortcut when I made "chicken marsala" the second time. I cooked a whole chicken in 35 mins in the microwave using my Pampered Chef Covered Baker. Dinners are a breeze with that thing and the chicken turns out tender, juicy, moist and delicious! Don't be afraid of the microwave. :) I could go on and on about how much I LOVE that baker. Anyways, I whipped together a modified version of chicken marsala. Since the chicken wasn't pan-fried/sauteed, the second version was a healthier one. It worked out well and tasted great! All I had to do was steam organic broccoli from my CSA basket, make the mushroom sauce and slice organic pears for dessert. Easy peasy!

Chicken Marsala

Yield: 4 servings

Ingredients:
  • 4 chicken cutlets (or 4 skinless, boneless chicken breasts pounded to 1/4-1/2" thick)
  • salt and pepper to taste
  • 1/4 c flour
  • 2 tbs oil
Sauce:
  • 3 tbs butter
  • 1/2-3/4 small onion, minced
  • 8 oz baby bella mushrooms, sliced
  • 4-6 cloves garlic, minced
  • 1 c Marsala wine
  • 3/4 c chicken broth
  • 1 tbs fresh lemon juice
  • 1 tbs fresh parsley, minced (I omitted since I didn't have any)
Directions:
  1. If you have thin chicken cutlets, go to step 2. If you have chicken breasts, place between sheets of wax paper and pound with flat side of kitchen mallet until flattened to 1/4-1/2" thick. If using whole chicken, cook your chicken then skip to step 5.
  2. Season cutlets with salt and pepper. Dredge cutlets in flour to coat and shake off excess.
  3. Heat oil in large nonstick skillet over high heat. Add cutlets and cook until golden brown, 2-3 mins on each side. Transfer to large plate and tent with foil.
  4. Reduce heat to med-high and melt 1 tbs butter in same skillet used for chicken. Saute onions and mushrooms 3-5 mins until browned. Add garlic and cook another 1-2 mins. Transfer mushroom mixture to bowl and tent with foil.
  5. Prepare sauce. Add Marsala and broth to empty skillet and bring to boil over high heat. Cook about 5 mins until reduced to 1/3-1/2 c. 
  6. Reduce heat to medium-low, return chicken and their juices to skillet and heat through about 2-3 mins. Transfer chicken to serving platter.
  7. Turn off heat, add remaining 2 tbs butter to skillet, lemon juice, parsley and mushroom mixture. Mix well and then pour sauce over chicken. Serve immediately and ENJOY!
Source: Adapted from Houseboat Eats

Wednesday, February 24, 2010

Chocolate Cookie Crunch

I made chocolate cookie bark a couple years ago at Christmas time as thank you gifts for Son #1's Room Moms and Teacher. The little baggies of chocolatey cookie goodness were a HIT! You know it's good when someone asks you for the recipe. This cookie bark is DELISH!

We're chocoholics so I'm very careful about how much chocolate I have in the house at any given time. I wanted to serve a yummy chocolate treat for my Bunco group so I made chocolate cookie crunch for the special occasion. The Buncolicious Babes absolutely LOVED it! :)

I wanted a chocolatey, crunchy treat so I didn't spread out the chocolate in a thin "bark" layer as I did in the past and I also doubled the cookies for more crunch. It tasted great! I even made a vegan version for my friend. I set aside semi-sweet chocolate with cookies and omitted the white "chocolate."

YUM YUM YUM!

This definitely satisfied our chocolate craving!

Chocolate Cookie Crunch

Yield: 12-14 servings

Ingredients:
Directions:
  1. Put Oreos in ziploc bag and crush cookies with rolling pin.
  2. Melt white chocolate and semi-sweet chocolate in separate bowls. I microwaved 3 mins and stopped and stirred after each minute. Add half the crushed cookies to each bowl and mix well.
  3. Line baking sheet with wax paper and drop spoonfuls of chocolate mixtures, alternating colors of chocolates. Cut through chocolate mixtures with butter knife for marbled effect.
  4. Refrigerate 1+ hrs or until firm. Break into pieces and serve.
Source: Adapted from kraftfoods.com

Tuesday, February 23, 2010

Warm Beet Salad

The first thing I pulled out of my CSA basket was a bundle of beautiful beets. The boys and I LOVE beets as they're naturally sweet and delicious. Definitely nature's candy in my opinion. I was excited to cook 'em up and this time I served the beet greens, too. Those who think beets are gross and taste like dirt need to try real beets. They taste nothing like canned beets. I promise! :) 

I served this as a side dish with Korean BBQ Beef. Son #1 (he's 8) ate the beets and greens in his Korean wraps. Son #2 (he's 6) and I ate the beets and greens on their own. After Son #2 asked Daddy why he didn't put beets on his plate, he reluctantly took a very small beet and didn't even try the greens. Not one little piece. :( Oh well, at least my kids will eat veggies from my CSA basket with me. :)

Oh, the colors and the fresh flavors!
ABSOLUTELY WONDERFUL!!!

Warm Beet Salad

Yield: 2-3 servings

Ingredients:
  • bundle of beets and their greens (about 5-6 beets but I wish I had MORE!)
  • 1/2 tsp olive oil
  • 2 tbs water (more or less depending on amount of beets and greens)
  • sea salt
Directions:
  1. Cut beets from greens and wash well. Since I had organic beets, I didn't peel mine, but peel yours if you prefer. Cut in half or quarters depending on size of beets. Wear gloves if you don't want red-stained fingers. :)
  2. Cut greens from beet stems, wash, chop and set aside.
  3. Add olive oil to medium frying pan and heat over over medium heat. Add beets and saute. Add a little water, cover and cook about 5-8 until beets are tender. Add more water if needed.
  4. When beets are tender, add beet greens and cover and cook about 1-2 mins until greens are wilted.
  5. Stir beets and greens and add a little sea salt. Mix some more.
  6. Put warm beet salad in serving bowl and eat immediately. It's delicious!

Notes: I prefer fresh beets with a sprinkle of sea salt because that's how my Mom serves them. So earthy, sweet and delicious! I'm sure they taste great with a drizzle of honey, soy sauce or sesame oil. Whatever you do, try a bite plain first. You'll be surprised at how fabulous this veggie is! I'm sure this will taste great as a cold salad, too. 

Source: Adapted from my Mom and La Fuji Mama

Monday, February 22, 2010

Crunchy Caramel Corn

My father-in-law made caramel corn for us years ago. It was such a sweet and delicious snack. Oh, how I love crunchy caramel corn! It was better than any you could buy and I'm pretty sure I ate the entire bag by myself. YIKES! I saved the recipe but never made it as the mere thought of making caramel seemed too gooey and messy. The last time I ate caramel corn was years ago and then my FIL brought some over for New Years. Wow! Still the best stuff ever! 


I have TONS of popcorn packets from Costco (that's the first and last time I'll ever buy bulk popcorn!) so I wanted to serve some of it at my Bunco night. Rather than just putting out plain popcorn (which is great, too), I wanted to take it a step further and serve crunchy caramel corn. I used microwavable popcorn since I have so much of it (that's not my FIL's recipe as my MIL "hates" microwave popcorn), and you know, it turned out great! It was a little messy but not any more so than sticky rice krispie treats. After I tossed the popcorn in the caramel sauce and got it in the oven, I soaked everything in hot water which made clean-up a breeze. 

Honestly, the hardest part of making this was waiting to eat it...especially during the cooling period!

WARNING: This is EXTREMELY addictive!
Eat one piece and you're done for.

Crunchy Caramel Corn

Yield: 12-14 servings...could be A LOT less if one is unable to stop eating this tasty treat! :)

Ingredients: 
  • 2 sticks butter (I used 1 stick)
  • 2 c brown sugar, lightly packed
  • 1/2 c corn syrup
  • 1 tsp salt
  • 1/2 tsp baking soda
  • 1 tsp vanilla
  • 2 bags microwaved popcorn, popped (approx. 12 c)
Directions:
  1. Pop popcorn according to package directions. Put popcorn in a very LARGE bowl and discard ALL kernels.
  2. In medium saucepan over medium heat, melt butter. Stir in brown sugar, corn syrup and salt. Bring to a boil, stirring constantly.
  3. Then, boil without stirring for 4 mins. Remove from heat and stir in baking soda and vanilla. 
  4. While caramel sauce is boiling, preheat oven to 225F and prep 2 baking sheets (use jelly roll-type pan that has sides) with foil and butter it.
  5. Gradually pour caramel sauce over popped popcorn and mix well. Be careful not to burn yourself! Divide into 2 prepared baking sheets and bake for 45 mins, stirring every 15 mins. Set your timer or you will burn your caramel.
  6. Remove from oven after 45 mins and cool completely before breaking into pieces. Store in airtight container.
Notes: Next time, I'll use 1 c brown sugar and agave syrup instead of corn syrup as a healthier alternative. But then again, I heard agave is just hype and that it's not a healthier alternative as it's processed, too. If you have additional info on agave, I'd love to hear from you. :) Thanks!

Source: Adapted from DG, my father-in-law

Friday, February 19, 2010

Korean BBQ Beef

When we eat at Kaju Tofu in Irvine, our fave Korean restaurant, three of us order beef tofu soup and my 6 year old orders kalbi, marinated shortribs. That stuff is SO good! He doesn't care for tofu soup as he can't get over the mental block that he's no longer allergic to soy. His brain still tells him to avoid it (weird, I know) but that's ok because he's a great eater aside from the tofu hang-up. 

Then, we heard about Zion Market in Tustin that sells marinated shortribs. I like their marinade more than the restaurant's. :) I also love that we can barbeque our own kalbi at home.  Oh, yeah...yummy stuff! 

I knew I could make my own kalbi marinade, and after searching and searching and searching some more...I finally found the recipe! Thanks, Week of Menus

I used flank steak instead of shortribs so I believe this is considered "Korean BBQ Beef" and not "Kalbi." I'll just call it... "DELICIOUS!"

I cut the ginormous flank steak from Costco into quarters because I wanted it to fit nicely in the rectangular dish.

Hubby kept as much garlic on the beef as possible. :)
OH MY! This was TASTY!!!

Fresh, organic lettuce from South Coast Farms in San Juan Capistrano.
I signed up for bi-weekly CSA baskets again.

My boys call this Korean "burritos" and inhale these wraps. They're SUPER delicious!
Wrap it up!
Lettuce leaf, 1/2 sheet of laver (Korean seaweed), rice, beef and red chili paste. 
I prefer a lot of chili, but since I wanted a picture of the sliced beef, I had to hold back. :)


Korean BBQ Beef

Yield: 4-5 servings

Ingredients:
  • 1-2 lb flank steak, rinsed, dried and cut in half across the grain
  • 1 bunch green onions, washed and rinsed well.
Sauce:
  • 1/4 c soy sauce (my soy is light as it's infused with garlic and kombu)
  • 1/4 c cane sugar
  • 1/4 c water (I forgot to add this)
  • 1 1/2 tbs sesame oil
  • 1 1/2 tbs sake (or mirin or sherry)
  • 2-4 tbs chopped garlic
  • 2 tbs sesame seeds, toasted
  • 1/2 tsp black pepper
Directions:
  1. In medium-sized mixing bowl, add sauce ingredients, mix well and set aside.
  2. Rinse and dry meat and cut in half into a smaller, more manageable/barbequeable-piece. :)
  3. Submerge steak into marinade and place steak into container/ziploc bag.
  4. Layer in green onions and place on top of steak. Continue with steak/onion layers until all steak has been sauced. Pour remaining marinade on top.
  5. Marinate overnight for best flavor or a 6-8 hr marinade period will taste great, too.
  6. Grill on BBQ or broil in oven for 12-15 mins depending on meat preference.
  7. Let flank steak sit for 5 mins before slicing. Slice AGAINST the grain and at a slight angle.
  8. To make wraps, layer lettuce, seaweed, rice, beef and chili paste for a fab dinner or place beef on top of bowl of rice for a beef bowl.
Notes: You can double the amount for flank steak and sauce ingredients. If you don't grill both flanks, freeze the leftover portion with the sauce. You just may end up cooking the second one, too. It's THAT good!

Source: Week of Menus

Thursday, February 18, 2010

White Enchiladas & Salsa

Enchiladas are a great way to use up leftover chicken and/or veggies. They've been my go-to recipe for years as they're so easy and fast to make. The beauty of the enchilada is that you can throw anything in them! I have a super delicious recipe for white sauce enchiladas but I wanted to try something that was lower in fat. Tonight I tried a bechamel sauce in lieu of my high calorie white sauce. This is not your typical enchilada but I thought it was fantastic! :)
Something different yet delicious.

I made salsa using  canned tomatoes and canned chipotles in adobo sauce.
I usually make fresh salsa, but with limited time and lack of fresh tomatoes, this is what I "pulsed" together and it was FAB! Smokey, spicy and satisfying for a "canned" salsa. 

A new enchilada recipe for the fam. We LOVED it!

White Enchiladas with Chicken

Yield: 10 enchiladas

Ingredients:
  • 2-3 large chicken breasts, cooked and shredded
  • 1- 15.5 oz can hominy, drained and rinsed
  • 3 c spinach, washed, dried and chopped
  • 1- 28 oz can green enchilada sauce (I only used about 19-20 oz)
  • 1/4 c cilantro, washed, dried and chopped
  • 10 tortillas, soft taco size
Directions:
  1. Boil, broil or grill 2-3 large chicken breasts. 
  2. In a very LARGE bowl, mix chicken, hominy, spinach and enough enchilada sauce to "wet" the chicken mixture.
  3. Spread some sauce in 9x13" baking dish to coat bottom. 
  4. Fill one end of tortilla with chicken mixture and roll.
  5. Place seam side down in baking dish. Roll remaining tortillas.
  6. If you have leftover chicken mixture, sprinkle over top of enchiladas. Spread a little more sauce on top.
  7. Preheat oven to 350F. Make bechamel sauce and pour over top of enchilada dish.
  8. Bake for 20 mins or until heated through.
Bechamel Sauce

Ingredients:
  • 2 tbs butter
  • 4 tsp flour
  • 1 1/4 c milk
  • 1/4 tsp salt
  • 1/8 tsp pepper
Directions:
  1. Melt butter in medium saucepan over medium-low heat.
  2. Add flour and whisk for 3-4 mins.
  3. Whisk in milk and increase heat to medium-high.
  4. Whisk until sauce comes to simmer and thickens about 3-4 mins.
  5. Whisk in salt and pepper.
Source: Adapted from foodnetwork.com

Smokey Chipotle Salsa

Ingredients:
  • 1- 15.5 oz can diced tomatoes
  • 1/4 red onion
  • 2 1/2 tsp garlic
  • 1-2 chipotle peppers in adobo sauce, sliced with the sauce 
  • salt, pepper, cumin and cayenne pepper to taste
  • 1/3 c cilantro, washed, dried and chopped
  • 2 limes, juiced
Directions:
  1. Cut onion into thirds and place in food processor. Pulse until chopped.
  2. Slice up chipotle then spread around top of onion in food processor. Pulse some more.
  3. Add remaining ingredients and pulse again. Don't overdo it if you want chunky salsa.
  4. When you have desired salsa consistency, pour into serving bowl. Add lime juice and mix well.
  5. ENJOY!

Wednesday, February 17, 2010

Gyros with Tzatziki sauce

I wanted to make something different with our leftover Greek chicken. I usually make soup or enchiladas but I wasn't up for either of those. I browsed my favorite foodie blogs for chicken recipes and found one for chicken gyros. I had all the ingredients so I was good to go!

As I was making the gyros, I thought of the first time I ate one. It was in Amsterdam about 17 years ago. The man behind the counter was smoking a cigarette and prepping food. Gross, I know, but every restaurant had smokers behind the counter so it wasn't like I could choose another restaurant. Once I got over the cigarette, I was able to enjoy my gyro. That was also the first time I ate lamb, and though I realized it wasn't my favorite type of meat, I thought the gyro with all its flavors was pretty darn good. 

The chicken gyros I made were pretty easy to whip together. We thought they were fantastic! 

MMMMM......the flat bread, the chicken, the veggies, the tzatziki...YUM!
This was delicious!

Chicken Gyros

Ingredients:
  • 2 large chicken breasts, grilled (I used leftover Greek chicken)
  • salt and pepper to taste
  • tomatoes, remove seeds and diced
  • 1/4 c red onions, diced
  • lettuce leaves (I used Romaine)
  • tzatziki sauce (recipe included below)
  • flat bread (or pocketless pitas)
Marinade:
  • 4-6 cloves garlic, minced
  • 1 lemon, juiced
  • 2 tsp red wine vinegar
  • 2 tbs extra virgin olive oil
  • 3 tbs lowfat Greek yogurt (I used the tzatziki sauce)
  • 1 tbs dried oregano
Directions:
  1. Put marinade ingredients in ziploc bag, hold bag tightly closed and shake it up till mixed well. Put chicken in the ziploc/marinade bag and marinate chicken for 1-2 hours in fridge. 
  2. Make flat bread while chicken marinates. Keep flat bread in tortilla warmer or wrap in damp towel.
  3. Preheat grill. Season chicken with salt and pepper and grill until cooked through. Let chicken rest for 4-6 mins before slicing into strips. If using leftover chicken, saute in its marinade in large saute pan till heated through. 
  4. Heat pitas/flat bread on gas stovetop, a few seconds per side. Top with lettuce leaf (leaves), chicken, tzatziki, tomatoes and onions. 
Source: Adapted from You're Gonna Bake It After All and Elly Says Opa!

Tzatziki Sauce

Ingredients:
  • 8 oz lowfat, strained Greek yogurt (I used plain yogurt as I didn't have Greek yogurt)
  • 1/2 cucumber, shredded (Hubby's not a big cucumber fan so I left this out)
  • 3-5 cloves garlic, minced
  • 1 tsp white wine vinegar
  • salt and pepper to taste
  • 2 tsp lemon juice
Directions:
  1. Shred cucumber and squeeze out liquid using paper towels.
  2. Mix together all ingredients and refrigerate for 1 hr before serving.
Notes: Save leftover sauce for veggie dipping sauce or as sandwich spread. A healthier alternative than Ranch or mayonnaise. :)

Tuesday, February 16, 2010

Greek Salad with Chicken

I had quite a bit of leftovers from our Greek chicken dinner. Since Hubby's out of town, we barely put a dent in the bird. My sis came over and I put together a wonderful Greek salad for us. It was light yet hearty enough that it felt like a "real" meal. :) The boys ate it up...every last bite! I'm so lucky that my kids will eat everything I serve them. That definitely makes meal planning and cooking very easy. YAY!

FRESH!

Greek Salad with Chicken

Yield: 4-6 servings
Salad:
  • 1 head Romaine lettuce- washed, dried and chopped into bite-sized pieces (I used spinach)
  • 1-2 c shredded, cooked chicken
  • 1 c grape tomatoes, sliced in half
  • 4-5 mini cucumbers, chopped
  • 1/2 c Kalamata olives, pitted and sliced in half (what a bummer...I didn't have any)
  • 1 c Feta cheese, crumbled
Directions:
  1. Measure dressing ingredients in a jar with tight fitting lid. Shake well and refrigerate.
  2. If making a stunning salad for a party, spread out salad ingredients in a "line." It gives the salad a nice layered look. I made salad for the fam so I skipped the fancy schmancy look and threw everything in individual bowls. It was colorful and still had a restaurant look to it. 
  3. For a pretty party salad, in large salad bowl, place chopped lettuce on bottom. Use a LARGE bowl that gives you plenty of room to toss the salad. Spread chicken over top of lettuce.
  4. Carefully line sliced tomatoes down center of salad.
  5. Line chopped cucumbers down both sides of tomatoes.
  6. Then Feta goes on outside of cucumbers creating line again.
  7. Last, fill in edge of salad bowl on both sides of Feta with Kalamata olives.
  8. Leave salad as is until ready to eat. The layered look is quite impressive. :)
  9. Right before serving, shake salad dressing well. Pour half the dressing on salad and toss well. Don't overdo the dressing.
Shallot Vinaigrette Dressing
  • 1/2 c extra virgin olive oil
  • 1/2 c red wine vinegar
  • 3 tbs shallots, minced
  • 1 tsp oregano
  • salt and pepper to taste- go easy on the salt as greek olives and Feta are salty.
Source: Adapted from Week of Menus

Monday, February 15, 2010

Red Velvet Cupcakes

This post is dedicated to my Hubby's cousin, Deanna, who battled breast cancer when she was 6 mos pregnant. She had a mastectomy and three rounds of chemo in Dec. '08 WHILE pregnant and gave birth to a healthy boy in Mar. '09. Amazing!

In June '09, I participated in the AVON Walk for Breast Cancer walk in San Francisco. I raised $2,100 and walked 39.3 miles (Day 1= 26.2 miles and Day 2= 13.1 miles) for my Mom, Deanna and everyone else that has been affected by this horrible disease. It was truly startling to see thousands of people in pink. There are way too many people affected by breast cancer. :( Please remember to get your annual check-ups and take time to do your monthly self exams. I registered to walk this Sept. in Santa Barbara. If you could drop by my fundraising page and make a small donation, I would GREATLY appreciate it. 

Last month, Deanna started feeling a lot of bone pain. Tests showed the cancer had metastasized, and by Feb. 5th, she was sent home to spend her final days with her family. She was given a few days to three weeks. I was shocked to say the least and even more shocked by how quickly she deteriorated. She passed away on the 11th. :( Life is so unfair sometimes. I just don't get it.

Today was Deanna's service to celebrate her beautiful life. I am thankful I had an opportunity to have known such a wonderful woman and I am also thankful she is now pain-free. 

1970-2010
Deanna, 39 yrs young, mother of 3 with her miracle baby.
She was absolutely amazing, smiled often, stayed positive and was so courageous. 
Deanna you are missed and loved by many!

OXOXOXOXOXOXOXOX

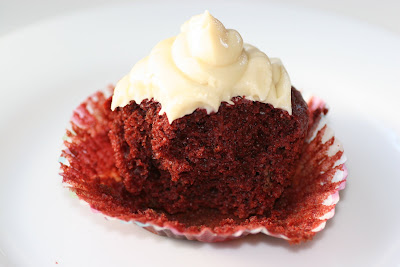
I baked Red Velvet Cupcakes today. Red Velvet = Love. Deanna enjoyed baking and I know she would've enjoyed these!

My kind of "Red Delicious." :)

Let's find a CURE!

A mild-flavored, moist cupcake with a hint of chocolate and sweet, buttercream frosting.
YUMMY! 

Red Velvet Cupcakes

Yield: 12 cupcakes

Ingredients:
  • 1 c milk
  • 1 tsp apple cider vinegar
  • 1 1/4 c flour
  • 2 tbs cornstarch
  • 3/4 tsp baking powder
  • 1/2 tsp baking soda
  • 1/4 tsp salt
  • 2 tbs cocoa powder
  • 3/4 c sugar
  • 1/3 c canola oil
  • 1 tsp vanilla extract
  • 1/2 tbs red food coloring
Directions:
  1. Preheat oven to 350F. Line muffin pan with cupcake liners.
  2. Whisk milk and apple cider vinegar in measuring cup and set aside a few minutes to curdle. If you prefer eggs, skip the milk/vinegar mixture and use 2 eggs.
  3. In stand mixer bowl, mix flour, cornstarch, baking powder, baking soda, salt and cocoa powder.
  4. Slowly mix in sugar, oil and vanilla. Add milk/cider mixture. Mix well.
  5. Fill cupcake liners 2/3 full and bake for 20-22 mins or until toothpick inserted in center comes out clean.
  6. Transfer to cooling rack and cool completely before frosting.
Source: Adapted from foodnetwork.com

Vanilla Buttercream Frosting

Yield: 12 cupcakes

Ingredients:
  • 1/2 stick butter
  • 2 tbs shortening
  • 1 1/2 c powdered sugar
  • 1 tsp vanilla extract
  • 2 tbs milk (more or less for right consistency)
Directions:
  1. Cream butter and shortening.
  2. Add powdered sugar, vanilla and milk until combined.
  3. Pipe or spread onto cupcakes
Notes: If using Nucoa margarine instead of butter, you do not need the shortening.

Sunday, February 14, 2010

Greek Chicken

Baking a chicken is so easy in my Pampered Chef Covered Baker. I LOVE THAT THING! It was expensive but I've used it so many times that I've gotten my monies worth for sure. I love that I can cook a whole chicken in the microwave in 35 minutes if I'm pressed for time. It's fast and easy and the chicken is always tender and juicy. I can also bake a whole chicken in the oven if I have 1-2 hours of prep time for dinner. Since I bought chicken and Feta cheese from Costco, Greek chicken was on the menu tonight!

The chicken bakes evenly in the Baker. 
I'll use the bones and make homemade chicken stock.

Greek Chicken

Ingredients:
  • 4-5 lb whole chicken
  • sea salt and pepper to taste
  • oregano
  • thyme
  • garlic powder
  • 1 onion, quartered
  • 1 lemon
  • 6-8 cloves garlic
  • Italian flat leaf parsley (I used a BIG handful)
  • Feta cheese, crumbled (optional)
Directions:
  1. Preheat oven to 375F. Clean chicken and pat dry.
  2. Squeeze half lemon juice on outside of chicken and other half inside cavity.
  3. Sprinkle seasonings evenly over entire chicken.
  4. Place onion, garlic, parsley and used lemon inside cavity.
  5. Place chicken on roasting tray in foil-lined baking dish. If you have a Covered Baker, this is a great time to use it.
  6. Roast uncovered for 1 1/2 - 2 hrs or until meat thermometer reads 180F. If using your Covered Baker, bake COVERED for 1 - 1 1/2 hrs.
  7. Baste chicken after first hour and repeat every 15 mins. If you want crispy skin, don't baste during the last hour. If using your Covered Baker, you do not need to baste the chicken as it bakes in its juices and remains tender and moist from the baking process.
  8. When baked thoroughly, remove from oven and let chicken rest for 5-8 mins before carving. Serve with Feta cheese sprinkled on top.
Suggestions: Serve with salad, rice (squeeze a little lemon on top) and/or veggies.
Source: For the Love of Cooking

Saturday, February 13, 2010

Carne Asada

I LOVE DELICIOUS MEXICAN FOOD...I could eat it EVERY day! Hubby and I used to buy carne asada (marinated flank steak) from our local carniceria (Mexican meat market ) because I could never make good carne asada. Whenever I made it, the flavor was blah and the meat was always tough and leathery. A couple years ago, my chef friend, Kat, told me how easy it is to make it at home. It turns out, I wasn't marinating the flank steak properly or slicing the meat the right way either. With her helpful tips, I've been making tasty carne asada ever since. Last week's carne asada was grilled to perfection and the best I've made yet!

In this pic, you can see the grain runs left to right.
To have tender steak, cut against the grain.

It was PERFECT!
Next time, I'll cut it into thin strips typical of carne asada so it's easier for the kids to eat.

2/26/10 - Nice, thin slices of carne asada. YUM!

Carne Asada

Ingredients:
  • 1-2 lbs flank (or skirt) steak 
  • Emeril's Essence, to taste
  • 3-4 limes, juiced (I was out of limes so I used juice from 2 oranges)
  • 1/4 c olive oil
  • 4-5 cloves garlic, minced
Directions:
  1. Let flank steak come to room temperature. Wash and dry steak and rub with Emeril's Essence or seasonings of choice.
  2. In gallon-sized Ziploc bag, add lime juice, olive oil and garlic. Put steak in bag and marinate for 1-3 hours. Do NOT over-marinate as the lime slowly cooks the meat during the marinating process.
  3. Grill slowly on low and turn steak every 4-5 mins for about 30 mins.
  4. When meat is grilled to your liking (we prefer med-rare), place on cutting board and let sit for 5-8 mins before slicing.
  5. When ready to slice, be sure to cut AGAINST the grain. That keeps the meat tender. 
Suggestions: Serve carne asada on its own, sliced up for tacos, burritos, enchiladas or quesadillas. Eat in soup, salad or as topping for nachos. There are so many possibilities for leftovers. Cook once and serve at least 3 different meals with it. If you get burned out on the meat, put it in a ziploc and freeze it for future use. I made fresh guacamole, tortillas and rice for this carne asada. This was yummerific!


Source: Adapted from Kat, my chef friend.
Related Posts with Thumbnails